

How To Install A New Gas Cooker
How to Install a Gas Stove—Without Dangerous Leaks
Updated: Aug. 09, 2022
Install gas appliances correctly
Agape to hook upward a gas appliance? Y'all should be! A gas leak in your domicile can exist fatal. Here's the correct manner to connect a range and a water heater to the gas line.
Y'all might also like: TBD
- Time
- Complication
- Cost
- A full solar day
- Beginner
- $51–100
How to hook upwards a new gas stove and range
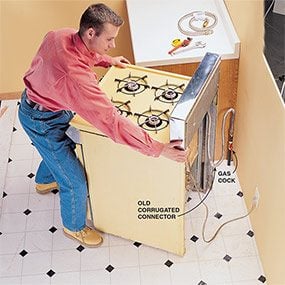
Photo 1: Pull out the range
Pull out the range, and shut off the gas cock (encounter also Photo 2). The gas is off when the lever is at a correct angle to the pipe. This shutoff may be located behind the range, or in the basement only below. A shutoff is required in the line to the range, and should exist added if y'all don't have ane. Don't forget upkeep, larn how to make clean a stove tiptop the best way.
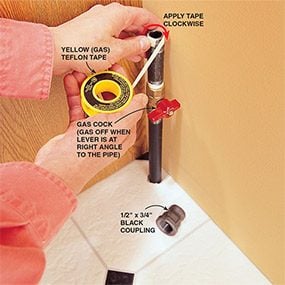
Photo 2: Wrap the pipe threads
Wrap Teflon pipe-articulation tape twice around the threads in the aforementioned direction that the plumbing equipment screws on (clockwise). Yellow Teflon tape, heavier than white, is meant for gas fittings. The i/2-in. x 3/4-in. coupling accommodates the 3/4-in. cease connector plumbing equipment (Photograph iii), since connectors with 1/2-in. stop fittings at both ends are not always readily available.

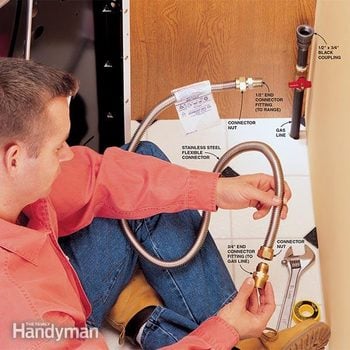
Photograph three: Spiral the connector to the gas line
Remove the end connector fitting, wrap the unbeveled end with Teflon tape, and spiral information technology to the gas line. This end plumbing equipment can exist either male person or female person. ALWAYS employ both of the removable end fittings. NEVER screw the connector nuts that are on the ends of the corrugated tube to a blackness gas fitting or pipage. This would exist a guaranteed leak.
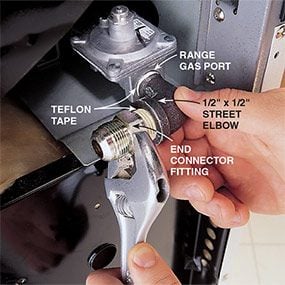
Photograph 4: Utilize a street elbow
Screw a 1/2-in. x ane/2-in. street elbow (male threads at ane finish, female at the other) into the range gas port. Then spiral the connector's other end fitting into the street elbow. Use Teflon tape on each plumbing fixtures. Be careful not to overtighten, putting excess stress on the range's gas port fitting.

Photo 5: Tighten the basics
Tighten the connector nuts to the two stop connector fittings. While tightening the nuts, hold the tube straight against the fitting. Do NOT use Teflon tape on these threads. The beveled edges of the terminate fittings are meant to form a tight seal confronting the ends of the corrugated tube. Using record can interfere with this seal.

Photo 6: Check for leaks
Turn on the gas cock (vertical position) and light the range burners for about a infinitesimal to get the air out of the gas line. Then spray all the joints you've made with gas leak detector (sold at abode centers). You tin can besides use warm, thick soapy water for this. Bubbles effectually a joint volition betoken a leak.
Hooking upwards a gas range or water heater is a relatively simple job requiring merely basic tools and readily available supplies. And if you use the correct materials and follow instructions carefully, you can safely do the job yourself. A professional may accuse as much equally a few hundred dollars for a hook-up.
Nosotros'll show you in this article how to practice 2 basic types of gas connection: hooking up a gas range using a flexible, corrugated connector (a gas clothes dryer is similar); and using threaded black steel gas piping to hook upwardly a water heater.
Flexible corrugated gas connectors and gas pipe and fittings (black) are available at most dwelling house centers and well-stocked hardware stores. Stainless steel or coated brass connectors are the simply type of flexible connectors sold these days, and the simply blazon you tin safely and legally utilize. Older types of corrugated connectors—sold until the 1980s—fabricated of uncoated brass or other metallic accept been found to be dangerous. Have 1 in your house? Replace it at present!
The most important step to a safety installation is to buy the correct connector. Here's what to look for:
- Purchase a connector that is clearly marked for the appliance you lot're hooking upward—either "range" or "dryer." Typically the corrugated tube of a range connector is i/two in. dia. i.d. (inside diameter), and a dryer connector is 3/eight in. dia. i.d. These dimensions are not e'er marked on the parcel, but they will be marked for either range or dryer.
- Buy a connector that comes packaged with the end connector fittings you need (come across Photo three). Usually the gas line coming into your kitchen volition be ane/2-in. black threaded pipe, and the connectedness to the stove volition be either a male (external threads) or female (internal threads) 1/ii-in. plumbing equipment. If yous cannot find a connector parcel with terminate fittings that match what you need for the gas line, apply a blackness gas pipe plumbing equipment on the line to arrange the terminate connector fitting. For case, in Photos 2 and 3, we show a 1/2-in. ten iii/4-in. coupling on the gas line to arrange the 3/4-in. cease connector fitting. (For more than possible connections and data nearly connecting to soft copper supply lines, meet How to Connect Gas Pipe Lines)
- Employ a connector that's enough long so you'll have enough room to piece of work between the stove and the wall. They come in lengths from 24 in. to threescore in.
- Don't reuse a flexible connector; if you become a new appliance, buy a new connector as well. Follow the instructions for installing the connector religiously. Our Photos 1 through 5 give a existent-life flick of how this is washed. Here are some additional guidelines:
- Be careful not to kink or force the corrugated connector into sharp bends, which could somewhen cause a break.
- Always bank check your work for leaks (Photograph six). Gas leak detectors are sold at abode centers, hardware stores and online.
- Although it'due south non always required to accept a range hookup inspected,nosotros strongly recommend that you lot call your local gas visitor or plumbing inspector to check your work.
Claw upward a gas water heater
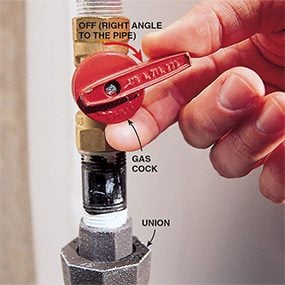
Photo i: Shut off the gas
Shut off the gas erect on the line inbound the water heater. It normally requires a i-quarter turn. When the lever is parallel to the pipe, the gas is on; at a right angle to the piping is off. A gas shutoff is required in the line; if you don't have ane, you'll need to install one.
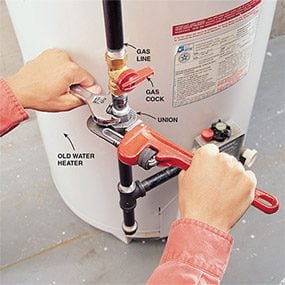
Photo 2: Unscrew the spousal relationship
Uncouple the gas line at the marriage, a plumbing equipment that should be located somewhere beneath the gas cock, equally shown hither and in Photos 4 and 5. Hold dorsum the top part of the union with one wrench every bit you unscrew the coupling section with a second wrench.
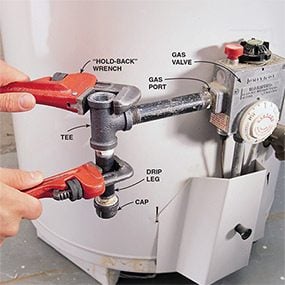
Photo three: Unscrew the tee
Remove the two brusk vertical lengths of pipe that run to a higher place and below the tee plumbing equipment. And so unscrew the tee along with the curt horizontal length of pipe running to the heater's gas port. Always use a second "hold-dorsum" wrench, as shown here and in Photo four, to forbid damage to the heater'due south gas port and gas valve. The "drip leg"and cap shown here is required to prevent droppings from clogging the gas valve.
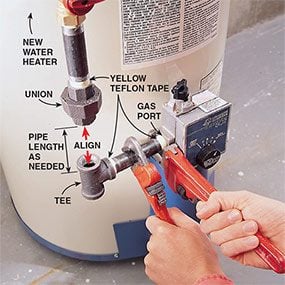
Photograph 4: Reassemble the gas line
Reassemble the gas line in the same configuration every bit it was. If your heater'south gas port is in a unlike horizontal location than the old one, y'all need to vary the length of the pipage being installed here to align the tee with the gas line. If the heater's gas port is in a different location vertically from the old one, you need to alter the length of the pipe higher up the tee. Measure out the altitude, and allow an actress ane/2 in. at each cease for the threads to screw in.
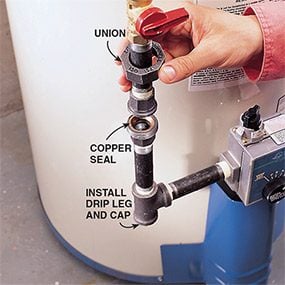
Photo 5: Reassemble the union
Reconnect the marriage. Note the copper seal that forms the gas-tight seal; make sure the pipe alignment is direct, and then the two sections of the seal will join upwards properly. Then tighten the union every bit shown in Photo two. Install the drip leg and cap as shown in Photo 3. Test for leaks.
The gas connectedness to a water heater is usually washed with rigid ane/ii-in. dia. blackness gas pipe. In some areas, information technology'due south acceptable to use a flexible stainless steel connector, similar to a range hook-up, simply cheque with your plumbing inspector or gas utility commencement. Rigid pipage is preferable, since a water heater's gas line is exposed and more than vulnerable to movement and harm.
In many cases, the gas port on your new h2o heater will be in the same location as the quondam one, relative to your gas line. This makes the claw-upwards easy: Just remove the short lengths of pipe and fittings, as shown in Photos 2 and 3, clean the threads, apply new Teflon record to the threads, and reconnect the entire assembly exactly as it was before.
Even so, if the heater's gas port is in a dissimilar location, you volition take to modify the length of one or mayhap two short lengths of piping, as shown in Photo 4. Nipples—brusk lengths of blackness piping—are sold at almost home centers in i/2-in. increments for the shorter lengths.
Here are some guidelines:
- Use yellow Teflon record, intended for threaded gas connections, not white Teflon record, which is thinner.
- Test all your joints for leaks.
- In most, but not all areas, a let and inspection is required for a water heater hookup. In either example, nosotros strongly recommend that you call your local gas company or plumbing inspector to check your work.
Required Tools for this Project
Accept the necessary tools for this DIY project lined up earlier you get-go—you'll save fourth dimension and frustration.
Required Materials for this Project
Avoid terminal-minute shopping trips by having all your materials set ahead of time. Hither'due south a list.
Originally Published: June xx, 2022

Source: https://www.familyhandyman.com/project/how-to-install-a-gas-stove-without-dangerous-leaks/
Posted by: grimmwomighon.blogspot.com
0 Response to "How To Install A New Gas Cooker"
Post a Comment